This is the foundational step of your 3D Blu-ray project. Because 3D Blu-rays use a specific "Multiview Video Coding" (MVC) extension of the H.264 codec, you cannot simply throw a Side-by-Side (SBS) file onto a disc. You must first separate the eyes into two distinct, standards-compliant video streams.
The Concept
We are taking a single "Full SBS" file (which contains both eyes side-by-side in one wide frame) and slicing it down the middle. Because your source might be a cinema-style "Ultrawide" format (like 3840x800), we must also add black bars (padding) to the top and bottom to reach the mandatory Blu-ray height of 1080 pixels.
Figure 1: Starting out with a full side-by-side (FSBS) video as seen in VLC.
Figure 2: Running a ffmpeg in a command prompt window (cmd.exe).
Command Breakdown
Parameter
What it does
Why it's important
split=2
Duplicates input in memory.
Guarantees exact same starting frame.
crop=1920:ih:x:y
Cuts 1920px wide box.
Separates left from right eye.
pad=1920:1080
Adds black bars.
Mandatory 1080p compliance.
-crf 16
Sets quality level.
Master quality preservation.
-preset slow
Higher compression quality.
Prevents 3D macroblocking.
Why this is an important step:
Timing: Splitting both eyes in one command eliminates "drift" between eyes and ensures an exact match of frames for both eyes. We end up with 2 outputted videos. One for the left eye view and one for the right eye view. Both have aspect ratios that blu ray standards expect.
Figure 3: We end up with two slightly different videos that have a blu ray aspect ratio.
Step 2: Extracting Master-Quality Audio
In this phase, we move from video to high-fidelity audio. Professional Blu-ray authoring requires "Elementary Streams"—clean, individual audio files stripped of their containers. For this, we need a blu ray source that matches your Side-by-Side video perfectly.
Part A: The MakeMKV Pull
Extract the data off the physical disc without changing a single bit of quality. Now it's time to pop in your blu ray disc or mount your .iso file, then proceed.
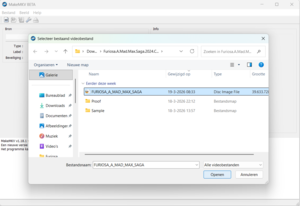
Open the Disc: Launch MakeMKV and click the Optical Drive icon.
Figure 1: Open your disc or iso file.
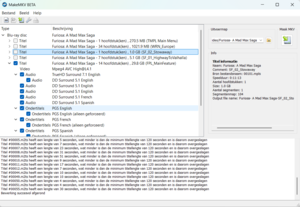
Select the Title: Find the largest Title (main movie).
Figure 2: Selecting only assets we are going to use later on.
Uncheck Video: You handled this in Step 1.
Select Audio: Check high-definition tracks (DTS-HD MA, TrueHD, etc.) and any other audio tracks you want to include. Also leave the subtitles checked you want to use later on.
Output: Click "Make MKV" to create your backup.mkv.
Part B: Extracting the Audio with FFmpeg
Professional authoring tools are extremely picky—they cannot read an MKV file directly. We need to perform "surgery" to pull out the raw audio data. Before we do that, we must identify exactly which audio track we want to grab.
1. Preliminary: Find your Track Number
Movies often have multiple audio tracks (different languages or commentary). We need to find the Stream Index of the one you want. Run this command:
ffprobe -v error -show_streams -select_streams a backup.mkv
Look at the results and find the language you need. The "Index" number determines your -map setting:
If your track is the first one listed: Use -map 0:a:0
If your track is the second one listed: Use -map 0:a:1
(And so on...)
2. Run the Extraction Command
Choose the command below that matches the type of audio you selected in MakeMKV. If your track index wasn't 0, remember to update the -map part!
Scenario 1: TrueHD or Atmos (The "Split" Method)
Blu-ray standards require TrueHD to be split into two files: a lossless .mlp and a compatible .ac3 core.
DTS-HD is simpler; the high-res audio and the "core" surround sound live in one file.
ffmpeg -i backup.mkv -map 0:a:0 -c copy movie.dts
Scenario 3: EAC3 (7.1 Dolby Digital Plus)
Commonly used for high-bitrate surround sound that isn't TrueHD.
ffmpeg -i backup.mkv -map 0:a:0 -c copy movie.ec3
Scenario 4: Standard AC3 (5.1 or 2.0 Stereo)
The universal standard for basic surround or stereo tracks.
ffmpeg -i backup.mkv -map 0:a:0 -c copy movie.ac3
Technical Cheat Sheet
If Audio is...
Use Extension
Why?
Atmos / TrueHD
.ac3 + .mlp
Plays on Atmos setups and legacy receivers.
DTS-HD MA
.dts
Contains both Lossless and Digital Surround core.
7.1 DD+
.ec3
Standard for high-bitrate Dolby Digital Plus.
Stereo / 5.1
.ac3
Universal standard for standard definition audio.
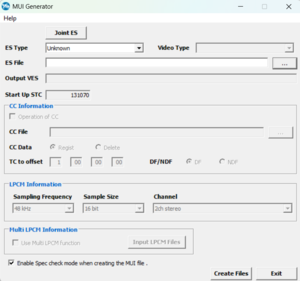
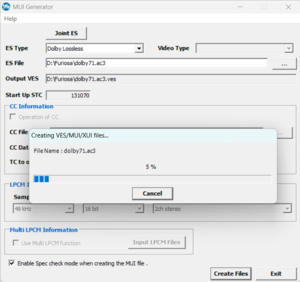
Part C: The MUI Generator (The "Scenarist Bridge")
Once you have extracted your files, you need to prepare the high-definition tracks. While standard AC3 files can be imported into Scenarist directly, Lossless HD formats (TrueHD/Atmos and DTS-HD MA) must be processed through the MUI Generator to create a "VES" (Video Elementary Stream) asset. If you have installed Scenarist, MUI Generator comes with the same installation package.
Figure 1: The MUI Generator.
For TrueHD / Atmos
Launch MUI Generator: Open the tool from your Scenarist suite.
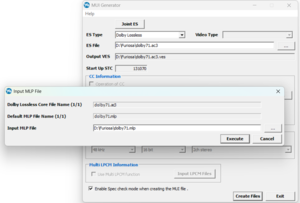
Input: Load your movie.ac3 file.
Figure 2: Load your ac3 file.
Settings: Select "Dolby Lossless" from the ES type dropdown menu. This tells the generator to automatically find the matching movie.mlp file in that folder and bind them together.
Figure 3: MUI generator will ask for your .mlp file.
Execute: The tool will generate a .ves and a .mui file.
Figure 4: MUI generator will create your .ves file for import into Scenarist.
For DTS-HD Master Audio
It is CRITICAL that you re-encode your audio first, from your source to .wav and back to .dtshd using DTS HD Encoder Suite. In order to get DTS HD Encoder Suite running, you will need to set your pc clock back to 2019 and disable your wireless network adapter. Also you should have found the seperate program called "MAS-SAS_Authorizer" that comes with DTS HD Encoder suite where you must register your serial number. For this version of the tutorial I won't be going deeper into this, but in the future this will be added.
It is possible that a 21ms delay needs to be added to your .wav files, this can be done with free tools. I will also elaborate on this in a future version of this tutorial. If you find that the audio of your final disc is out of sync, this is your problem and solution.
Launch MUI Generator: Open the tool. We are going to follow the same steps as described for TrueHD, but we will select DTS-HD from the ES type pulldown menu
Input: Load your movie.dts or movie.dtshd file.
Settings: Ensure the type is set to "DTS-HD".
Execute: This will create the .ves and .mui files needed for import.
If Scenarist complains about the bitrate, open the .ves file in notepad and ensure PeakBitrate uses a dot, not a comma. (This is a classic legacy bug in Sonic software (CineVision/Scenarist). If your Windows "Regional Settings" are set to a country that uses a comma as a decimal separator)
WARNING: Professional encoders add a 21ms "padding" to DTS-HD files. Scenarist automatically removes this. If your audio was extracted from an MKV, it lacks this padding. The Result: Your audio will be 21ms out of sync (late) unless you add a delay before you re-encode with the DTS-HD Master Audio Suite (MAS). You can NOT manually adjust the "Time Info" offset in Scenarist's Clip Editor to compensate.
For DD 7.1 EAC3 (.ec3 extension)
No MUI Generator needed. You can drag and drop your .ec3 file directly into the Data Tab of Scenarist. It must have 8 channels (7.1)
For Standard AC3 (5.1 or Stereo)
No MUI Generator needed. You can drag and drop your .ac3 file directly into the Data Tab of Scenarist. It is a "native" format that the software understands without a proxy file.
Direct Import Tip: In Scenarist, always go to the Data Tab to import your assets. Import the .ves file for HD audio, or the .ac3 file for standard audio. Once imported, they will be available to drag into your Track Editor.
Step 3: Extracting and Preparing Subtitles
Subtitles on a Blu-ray are not text files; they are high-quality images (bitmaps). To prepare them for professional authoring, we must extract them and "deconstruct" them into a format Scenarist can read.
Part A: Identifying Subtitle Tracks
Before extracting, you need to find which Stream Index belongs to the subtitles you want (e.g., English, forced subtitles, etc.). Use ffprobe to scan your MakeMKV backup:
ffprobe -v error -show_streams -select_streams s backup.mkv
Look for the index number and the TAG:language:
If the subtitles you want are the first subtitle stream listed: Use -map 0:s:0
If they are the second: Use -map 0:s:1 (and so on).
Part B: Extracting to .SUP Format
Once you have the index, we pull the raw bitstream out of the MKV container using the .sup extension—the standard raw format for Blu-ray subtitles.
(Note: Replace 0:s:0 with the index you found in Part A).
Part C: Converting for Scenarist (The XML/PNG Method)
Scenarist cannot import a .sup file directly. It requires a series of images (PNGs) and a timing script (XML). To do this, we use BDSup2Sub++.
⚠️ CAUTION: You must use the ++ version of BDSup2Sub. The regular Java-based version often lacks the stability and specific export features required for professional authoring.
Load the Asset: Open your movie_subs.sup file in BDSup2Sub++.
Verify Frame Rate: Upon loading, ensure the "Source FPS" matches your video (usually 23.976). If it doesn't, change the "Output FPS" to match.
Check for Delay: If your subtitles need to be offset (e.g., if the movie starts 2 seconds late), you can apply a global delay in the Edit menu before exporting.
Set Output Format: In the "Output Format" dropdown menu, select XML/PNG.
Export: Go to File > Export. Create a dedicated folder for this specific subtitle track (e.g., /SUBS_ENGLISH/).
The Result: The folder will now be filled with hundreds of PNG images and one .xml file containing all timing and positioning data.
ℹ️ IMPORTANT: Keep in mind that this folder or the .xml file cannot be dragged into CineVision’s Data tab yet. This is just the "deconstruction" phase.
Step 4: Extracting Chapters for Scenarist
Chapters are essential for navigation. Professional authoring tools like Scenarist are extremely specific about how they receive this data. You cannot simply import a text list; it must be a precisely formatted, single-line CSV string.
Part A: The Primary Source (MakeMKV Backup)
The most efficient way to get Scenarist-ready timecodes is using ffprobe on the MKV you created in Step 2. This file contains the precise timestamps from the original Blu-ray.
If you don't have the original disc backup, you can extract the chapters from your Full SBS MKV. Note that if the SBS was edited or trimmed, these chapters will be more accurate to your current video length than the original disc data would be.
Regardless of which source you used, Scenarist demands a very specific single-line format. It will not accept a vertical list or a standard text file. You must assemble the output into a .csv file following these rules:
1. The Mandatory Header
Your CSV file must start with the frame rate and the clock type. For a standard 3D Blu-ray, this is:
23.976,NonDrop,
2. The Timecode Formatting
Scenarist requires the format HH:MM:SS:FF (Hours:Minutes:Seconds:Frames).
The Millisecond Trap: Many tools output HH:MM:SS.ms (milliseconds). You must replace that last decimal with a colon and a frame number (00-23).
The First Chapter: You must always start the list with 00:00:00:00.
3. Final Assembly
Combine your header and your timestamps into one continuous line separated by commas. There should be no spaces or line breaks.
Final Result Example:
Your chapters.csv should look exactly like this:
ℹ️ PRO TIP: If your movie has 24 chapters, all 24 timecodes must sit on that same single line after the header. Scenarist will fail to import if the file contains multiple lines.
Step 5: Encoding for 3D (CineVision)
Now that we have all our assets prepared, it's time to encode the video. CineVision is the industry standard for 3D Blu-ray encoding, but it requires careful bitrate planning to ensure your final product fits on the disc and maintains high quality.
Part A: The 3D Bitrate Calculator
3D Blu-ray encoding is a balancing act. Use the tool below to calculate your Target Bitrate for CineVision and the TS Rates for Scenarist.
CineVision (Encoding)
Base Target:-- Mbps
Base Max:-- Mbps
Dep. Target:-- Mbps
Dep. Max:-- Mbps
Scenarist (Muxing)
Base TS Rate:-- bps
Dep. TS Rate:-- bps
*Calculated with a 15% muxing buffer.
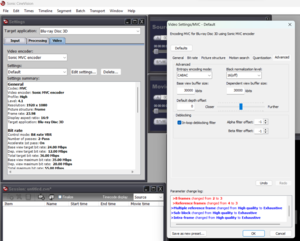
Part B: CineVision Settings (Truth vs. Myths)
Many legacy PDF guides contain advice rooted in the software instabilities of the early 2010s. Below is the breakdown of modern "Truths" versus "Bad Advice," followed by the optimized settings list.
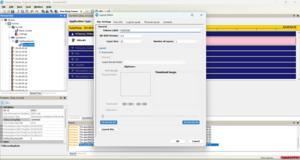
1. The Truth (What to Follow)
Scan Mode & Pixel Format: You must set Scan Mode to Progressive and Pixel Format to YV12. 3D Blu-rays are inherently progressive; encoding as interlaced will cause a critical failure during Scenarist import.
Figure 1: The Scan mode and Pixel format are chosen when selecting your input files.
GOP Structure: Setting B-frames to 2 and Pyramid structure DISABLED is the gold standard. This provides the best compression while staying within hardware playback limits.
Figure 2: The "Picture structure" tab uses 2 B-frame structure with pyramid DISABLED
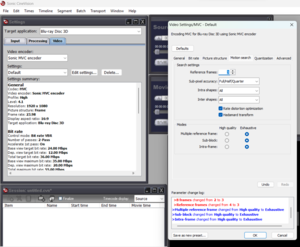
Motion Search: Setting this to Exhaustive is essential for quality. It is the slowest mode, but it ensures the encoder accurately maps the similarities between the Left and Right eyes to save bitrate.
Figure 3: CineVision's "Motion search" tab with all modes set to exhaustive.
Bitrate Buffering: Never max out your bitrate to the theoretical limit. Always leave a safety margin to prevent "Buffer Underflow" errors in the final muxing stage.
Figure 4: Choosing your bitrates should be done carefully. Use the calculator above to determine a good number.
2. The "Bad" (What to Ignore)
The "No Pyramid B-frames" thing: Some tutorials claim you should enable "Pyramid B-frame structure." This is incorrect for modern, stable environments. Pyramid B-frames (hierarchical B-frames) will create an unwatchable movie and should remain OFF.
It is common to see a "Buffer Underflow" error during the final muxing stage in Scenarist. Many users assume they need to go back to CineVision (advanced settings) to "increase the buffer," but this is a mistake. This happens due to a fault TSRecordingRate in Scenarist. You should leave both buffer sizes at 30000kbits in CineVision!
Figure 5: CineVision's "view buffer sizes" should stay untouched, as should the rest on this tab.
3. The "Perfect" CineVision Settings List
Use these specific settings to ensure a 100% compliant encode that imports perfectly into Scenarist:
Tab
Setting
Recommended Value
Video
Scan Mode / Pixel Format
Progressive / YV12
Bit Rate
Type / Max Bitrate
VBR (2-Pass) / 40,000 kbps (Total)
Picture Structure
B-Frames / B-Pyramid
2 / OFF
Motion Search
Reference Frames / Mode
4 / Exhaustive
Advanced
GOP Size
24 (or "Auto")
Encoding tip: In Cinevision, when encountering high bitrate spikes you want to keep those low enough because Scenarist will not mux video that exceeds bitrate limits. In the Bitrate Tab of you settings, lower the Maximum Quantization to a lower value. 85% is a sweet spot without impacting quality.
Part C: The Cleanup
Sometimes CineVision is "picky" with modern .mkv files. It might not accept any .mkv, so we use mkvmerge which is part of the MKVToolNix toolset.
Before you hit the "Start button" in CineVision, you need to understand the Transport Rate. Think of the Blu-ray player as a pipe: it can only handle a certain amount of data per second.
The 64.8 Mbps Speed Limit: The total transport rate of a 3D Blu-ray (the combined bitrate of your Video + all Audio tracks + Subtitles) cannot exceed 64.8 Mbps.
The Balancing Act: If you are only including one English DTS-HD track, you can afford a very high video bitrate.
The Warning: If you are adding five different languages or multiple lossless tracks, those audio streams "eat" into your speed limit. If the total data flow gets too high, Scenarist will throw a Buffer Underflow error because the "pipe" is full.
The Strategy: Use the calculator from Part A to ensure your settings are safe. It’s better to have a slightly lower bitrate than a disc that crashes your player.
6. Encoding and Finalzing
Once you have imported your Left and Right eye views and applied the "Perfect Settings" we discussed, first, tick the box that says "Finalize". It's located in the bottom "Session" winwdow. After that it’s time to encode.
Start the Encode: Go to File > Encode > Session. CineVision will now begin the heavy lifting of creating your 3D MVC streams.
It's important to do the Encoding and Finalizing at once, so really don't forget to tick that box beforehand. CineVision may throw an error at the end, or even crash. Don't worry, your outputted files should be fine.
Figure 8: In the bottom left "Session" window there's a small tickbox called "Finalize". Don't forget to check it.
Figure 9: Cinevision is going to take its time encoding 2 passes. At the end it might throw an error or even crash.
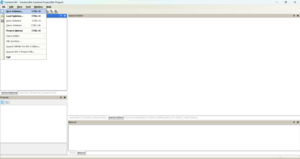
7. The Cleanup
CineVision creates a lot of temporary "junk" files during the process. To keep your project folder organized, you only need to keep two files for the next step:
The Base View: Look for the file ending in .mvc (This is your Left Eye).
The Dependent View: Look for the file ending in _d.mvc (This is your Right Eye data).
Everything else in that folder can be deleted. You now have the "Master Video Assets" ready for the final authoring stage.
Figure 10: The only files to be kept in the destination folder at this point are the .mvc and _d.mvc files.
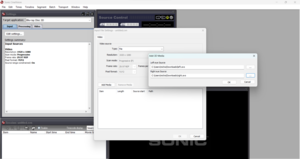
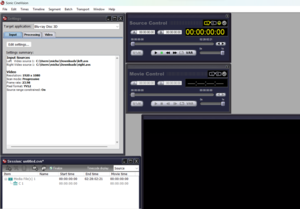
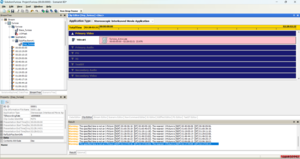
Step 6: Authoring in Scenarist BD
The Scenarist BD workflow
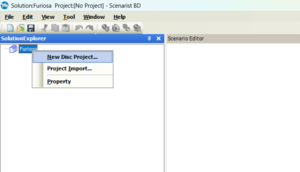
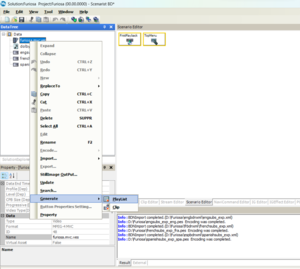
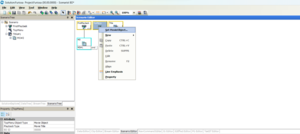
1: Create a new Solution.
Figure 1: Creating a new solution.
2: Once the solution is created, right-click it and select New Disc Project.
Figure 2: Creating a new Disc Project.
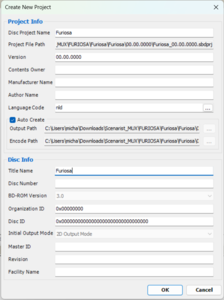
3: Give your disc and solution a clear, recognizable name.
Figure 3: Naming your disc and solution.
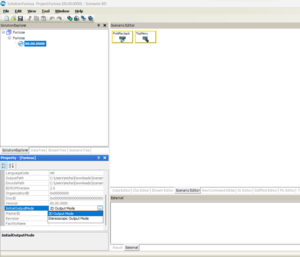
4: In the Solution Explorer, set InitialOutputMode to Stereoscopic. This is required for Blu-ray 3D.
Figure 4: Changing the output mode to Stereoscopic.
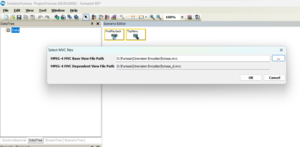
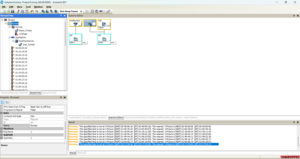
5: Go to the DataTree tab and drag your .mvc file onto Data. You will be prompted to select the corresponding _d.mvc file.
Figure 5: Adding your video assets.
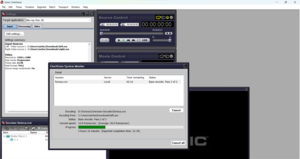
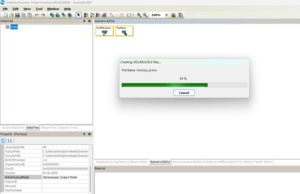
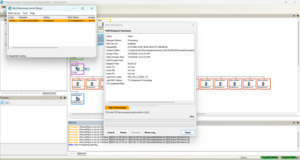
6: Scenarist will generate VES/MUI/XUI files. This may take a few minutes. Once complete, your video streams will appear under Data.
Figure 6: Scenarist is processing your video files.
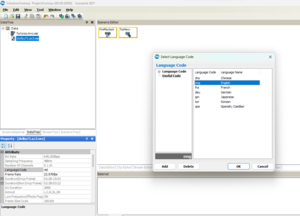
7: Drag your audio file into the DataTree. For TrueHD 7.1, use the generated .ves file. Double-click it and set the correct language code because it will default to your system language.
Figure 7: After dragging your .ves file onto the data assets, be sure to check the language code.
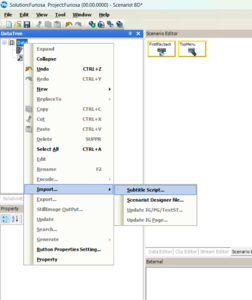
8: Import subtitles via Data → Import → Subtitle Script. Select your XML file (created with Sup2Sub++). Accept the start time prompt and save the resulting .pes file. Repeat for all subtitle tracks.
Be sure to save them somewhere where your assets are and not where your MUX is going to happen. If you for some reason have to start over these will be gone if you clear your mux folder if you save them there.
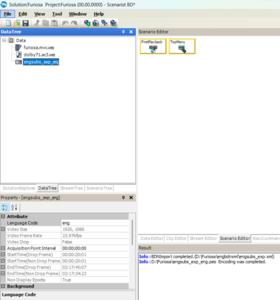
9: Verify that each subtitle stream has the correct LanguageCode.
Figure 9: The bottom left window allows you to choose the correct language code.
10: Right-click your .mvc.ves and select Generate → Playlist. It may look like nothing happens.
Figure 10: Generate the playlist by right-clicking only the main video file.
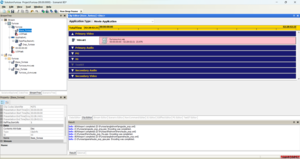
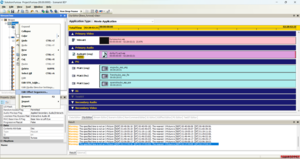
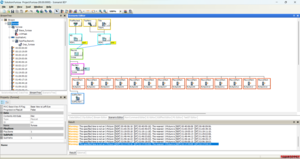
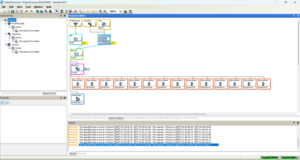
11: Go to the StreamTree tab and expand everything. Double-click Base_video to confirm the video is loaded (blue bars).
Figure 11: We move on to the StreamTree tab and open our video.
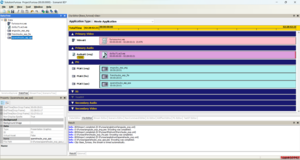
12: Link your assets by dragging them from the Data tab into the right window we just opened.
Audio → Primary Audio
Extra audio → Secondary Audio
Subtitles → PG (Presentation Graphics)
Figure 12: After adding the rest of our assets it looks something like this.
13: Import chapters via Playlist → Import → Chapter File. Select the .csv file we made earlier.
Warnings about I-frames are normal. Scenarist will snap the positions to the frame it wants automatically so this can be safely ignored.
Figure 13: Importing our chapter .csv file.
14: We are now going to give our subtitles depth. If we don't they'll look flat when watching a 3D movie.
There are other and better ways to do this, by generating another format of subtitles and having them set at the depth we want,
but for the sake of sanity, we will use a system-wide setting that works fine for our use case.
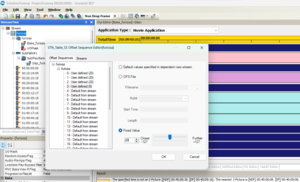
Right-click playlist → Edit Offset Sequences and configure subtitle depth, see next step.
Figure 14: Changing the Offset (aka depth) for our Presentation Graphics (aka subtitles).
15: Set subtitle depth, we want to use anything between 10 and 30 as industry standerd:
Select “0 – Default from stream”
Set to Fixed Value
Use value 20 (recommended)
Repeat for each subtitle stream. You'll notice there are 32 possible offset sequences (0-31). This is because the technical limit for a blu ray is to hold a maximum of 32 subtitle tracks.
Don't worry you only need to change this for the amount of subtitle tracks you've chosen to add.
Figure 15: Changing the values to 20.
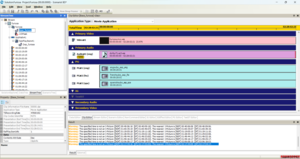
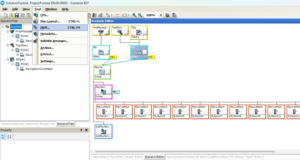
16: Open the ScenarioTree. You will see FirstPlayback and TopMenu.
Figure 16: Moving on to the next tab: ScenarioTree.
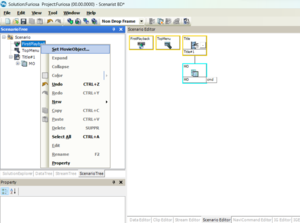
17: Right-click Scenario → New → HDMV Title.
Figure 17: Adding a new Title Object
18: Right-click FirstPlayback → SetMovieObject. Repeat for Title
Figure 18: We have set a MovieObject for Title here
19:If done correctly, it should look like this. Now rename the MovieObject under Title to MO#2 by clicking on it and typing.
Figure 19: We have set two MovieObjects, rename the second one.
20: Now we are going to link the topmenu to the second movieobject. Right-click TopMenu → SetMovieObject → select MO#2.
Figure 20a: Link the topmenu to the second movieobject.
Figure 20b: The result if everything is linked correctly.
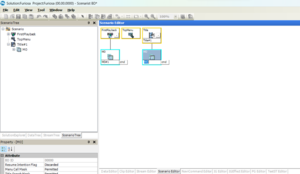
21: Go to StreamTree and drag your playlist onto both MO#1 and MO#2.
Figure 21: Your Scenario Editor should now be fully linked and resemble this screenshot.
Critical Validation
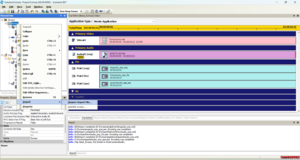
22: Check the Base Movie Clip, on the bottom left of your screen you will see:
Set TSRecordingRate
Note the exact Presentation End Time
Set your TSrecordingRate to what we calculated earlier with the calculator!
Figure 22: The bottom left property tab holds critical information.
23: Check the dependent (MVC) stream:
Set TSRecordingRate
Ensure End Time matches exactly
If not identical, your 3D will fail on hardware players.
Figure 23: The dependent stream also needs it TSRecordingRate set, and timestamp checked.
Disc Layout
24: Go to Tool → Disc Layout:
Set Volume Label
Select 2 layers for BD50, skip this if you are making a 25GB disc.
Click “Layout Disc”
Ensure Layer 0 is larger than Layer 1.
Figure 24: Choosing the disc layout.
25: At the very bottom right of your screen, confirm both layers are displayed correctly.
Figure 25: Verify that layer 1 is NOT bigger than layer 0 at the bottom right of your screen.
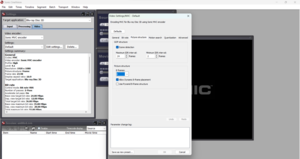
Muxing
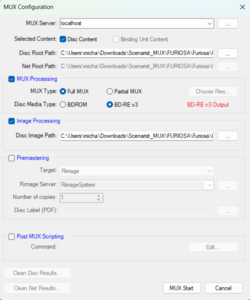
Screenshot 26: Go to Tool → Mux.
Figure 26: Time to start muxing, keep those fingers crossed.
27: Select BDRE v3 Output and choose a location with enough free space, at least double your disc size.
Figure 27: Time to start muxing, keep those fingers crossed.
28: Start muxing. If errors occur:
Buffer underrun → TSRecordingRate too low
Fails at 50% → incorrect TSRecordingRate
Disk full → insufficient space
Figure 28: Muxing has begun, this will take a while.
Final Notes
You now have a fully functional Blu-ray 3D structure with:
Proper MVC video
Blu ray quality aduio
Chapters
3D subtitles with depth
This guide focuses on a clean, no-menu disc for maximum compatibility.
Important: If your disc plays in 2D only, verify:
MVC was added after AVC
MVC is correctly linked as dependent
Both streams have identical duration and frame count
 Figure 1: Starting out with a full side-by-side (FSBS) video as seen in VLC.
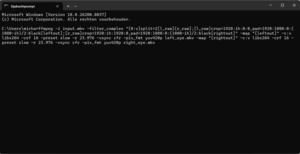 Figure 2: Running a ffmpeg in a command prompt window (cmd.exe).
 Figure 3: We end up with two slightly different videos that have a blu ray aspect ratio.